**Overview of the Electronic Light Box**
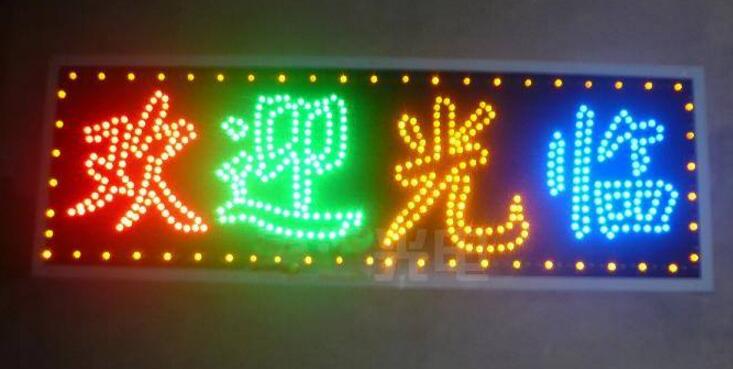
The electronic light box is a versatile advertising sign designed for both indoor and outdoor use. It is widely used in various scenarios due to its high brightness and strong visual impact. Unlike traditional neon signs, it uses LED as the light source, combined with materials such as acrylic, aluminum composite panels, or plastic plates. This combination makes it more energy-efficient, longer-lasting, and environmentally friendly.
One of the main advantages of the electronic light box is its ability to attract attention easily. Its bright spots make the advertising effect more noticeable compared to other types of light boxes. The dazzling effect helps draw people’s eyes, making it an effective tool for marketing and promotion. As the market for these products continues to grow, the price has become more affordable, giving it a competitive edge in the industry. It is expected to be one of the key advertising tools in the future.
The electronic light box is also known for being energy-efficient, generating less heat, and having a long lifespan. It is safe, reliable, and waterproof, making it suitable for different environments. Additionally, it can display text or patterns in any color, offering great flexibility in design.
**Steps to Make an Electronic Light Box**
(1) **Materials Required:**
- Frame: Typically made from 5cm aluminum profiles.
- Light Source: LEDs (Light Emitting Diodes).
- Panel: Aluminum composite panel or acrylic.
- Lettering: Acrylic sheets and adhesive.
- Frame Bracket: Special 5cm aluminum profile.
- Controller: Available in 5-channel, 6-channel, 7-channel, 8-channel, 12-channel, 12V3+1 channel, and 14-channel versions (high-power programmable controllers). The controller converts 220V AC to 220V DC and allows for various lighting effects through MCU circuit functions.
(2) **Tools Needed:**
- Electric drill (with a 5.0mm bit)
- Soldering iron
- Small pliers
- Hot melt glue gun
- Electronic light box tester
**Step-by-Step Process:**
(1) Cut the required words or patterns onto the base plate using a cutting plotter or edge milling machine.
(2) Drill holes or engrave the pattern to match the size of the LED diodes.
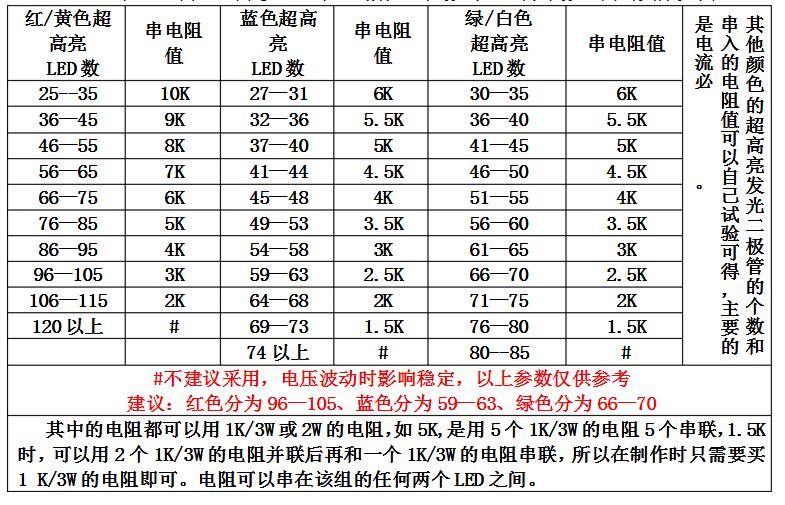
(3) Connect the LEDs in series. Remember that the larger head of the LED is the negative pole, while the smaller head is the positive pole. Solder them together carefully. A typical series connection includes up to 90 red/yellow LEDs and 65 blue/green/white LEDs. The number of resistors needed depends on the number of LEDs used.
(4) Connect each word or pattern in parallel.
(5) Seal the connections with hot melt glue to prevent water damage and misalignment. Ensure that no two LED pins are shorted.
(6) Connect the wires to the controller according to your desired lighting effect, such as flickering or running lights.
**Graphic Production Process:**
1. **Material Selection:** Use a 2.5mm or 3mm aluminum composite panel. The 2.5mm version is suitable for small double-sided light boxes.
2. **Cutting:** Cut the panel to the desired size using a utility knife and fix it with wooden strips. If using an aluminum frame, place it for stability.
3. **Engraving:** Use an engraving machine to cut out the desired sticker or text. The color of the sticker should match the LED color you plan to use. If not an advertising company, consider outsourcing this step.
4. **Drilling:** Create holes for the LED placement. The distance between the lights should be around 1.5cm. A wider spacing may result in a better marquee effect.
5. **Installation:** Arrange the LEDs according to the design. Connect them in series, ensuring that each string has only one positive and one negative pole. Divide the lights into groups if necessary.
6. **Testing:** Check that all words are lit properly. Then, connect the side lights and test the running effect. Label the wiring for clarity.
**Materials for Making a 12V Electronic Light Box:**
- Panel: Aluminum composite panel
- Controller: Two-way or five-way (as per customer needs)
**Production Tools:**
- Flashlight
- 4.9mm drill
- Multimeter
- Light box resistance adapter
- Screws and screwdriver
- Needle-nosed pliers
- Glue stick and glue gun
- Electric iron
- LED electronic light box tester
**Production Steps:**
1. Cut the aluminum composite panel to the required size (e.g., 122x244 cm), minimizing waste.
2. Send the customer's design to the art department and apply instant stickers or spray paint for a clean, durable finish.
3. Based on the font and size, determine the spacing between the LED points—typically 1.5–2 cm for patterns and 3 cm for lights. Adjust as needed for better visibility.
4. Punch the holes using an engraving machine and clean any burrs.
5. Install the LEDs, ensuring correct polarity (+ and -) for easy connection.
6. Apply glue to secure the LED connections. Solder the corners for a stronger hold.
7. Connect the LEDs in series within each word or pattern. Limit the number of LEDs per circuit to avoid overloading. For large designs, add additional circuits.
8. Connect multiple words or patterns in parallel.
9. Perform anti-static measures during the process.
10. Double-check that no LED pins are shorted.
By following these steps, you can create a professional-looking electronic light box that is both functional and visually appealing. Whether for commercial use or personal projects, this guide provides a clear path to building a high-quality, energy-efficient light box.
Outdoor Trolley Power Supply,Solar Energy Storage,Outdoor Charging Station,Outdoor Storage Battery
Sichuan Liwang New Energy Technology Co. , https://www.myliwang.com